The most common ways to cook turkey are roasting, smoke cooking and deep-frying. Roasting the turkey is the most conventional and done right will produce a tender, succulent, juicy picture perfect turkey.
Roasting the turkey: Place the turkey breast side up in a shallow pan (about 2 1/2 inches deep). Insert oven safe thermometer in the thickest part of thigh and rub entire turkey with oil to enhance color. Place in a preheated 325°F oven. Check the chart below for cooking times. When skin is lightly browned and about two-thirds done, place a piece of foil over the breast to discourage drying out and overcooking of the breast.
Turkey is done when the thermometer reads as follows:
~ 180 to 185°F deep in the thigh; also, juices should be clear, not pink when thigh muscle is pierced deeply.
~ 170 to 175 °F in the thickest part of the breast, just above the rib bones.
~ 160 to 165 °F in the center of the stuffing, if the turkey is stuffed.
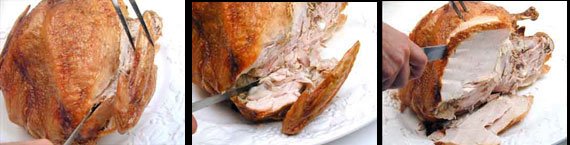
Let the turkey sit for 15 minutes to avoid juices running out when carving.
Smoking a Turkey: If you want to smoke a turkey, it is best not to pick the biggest turkey you can find. Most smoked turkeys are in the 10-14 lb range simply because they take a long time to cook. Generally a 12 lb turkey can take 6-8 hours to cook; a larger turkey would spend too much time in the"Danger Zone" - between 40°F and 140°F --too long. Estimate 20 to 30 minutes per pound of turkey.
A smoked turkey cannot be stuffed; the stuffing will not cook correctly and has an unsatisfactory taste. The good thing is it is impossible to overcook a smoked turkey.
The flavor of the turkey comes from the smoker itself, but you can add a little salt, pepper or poultry seasoning. If you'd prefer to use a dry rub, do so 24 hours prior to smoking for the best flavor. Besides the smoker, you need wood chips and a pan for water. Get creative with your smoke by experimenting with different types of wood -- hickory or mesquite (the most popular), any chunks or chips of water-soaked hardwood or fruitwood will work, but do not use softwoods like pine, fir, cedar or spruce as they will give the food a turpentine flavor and coat it with an ugly and inedible black pitch. Also, instead of smoking with water, try wine or juices to change up the flavor. Before you put the turkey onto the smoker, rub the bird with oil to enhance crispness.
When the smoker is all fired up and ready to receive its precious cargo, place the turkey in a roasting pan, breast-side up, and then set it in the smoker and close the lid. You can baste the turkey with its own juices a few times during smoking, but avoid opening the smoker too often; you will lose heat and increase the cooking time.
Be safe; put the smoker in an area shielded from winds to ensure a consistent temperature. Make sure to keep a fire extinguisher handy in case of mishaps.
Frying a Turkey: Deep fried turkeys are becoming more popular every year. It's simple, timesaving and tasty. This method requires a 40- or 60-quart pot with basket, burner and propane gas tank; a candy thermometer to measure oil temperature; and a meat thermometer to determine if the turkey is done.
**Keep the fryer outdoors (no garages, concrete or wood decks either) and away from small children and pets. Never leave the oil unattended; also keep a fire extinguisher and potholders nearby.
As with other methods, thoroughly clean the turkey and remove the gizzards. Do not stuff a turkey that is meant for deep-frying. If you are keen on stuffing, cook it separately. There are flavor injectors that are bought separately to inject flavor into the bird. You can inject herbs, butter sauces or the popular cajun marinades under the skin of the turkey. The turkey is injected both in the breast and thigh, leaving a juicier turkey.
Use a pot that is big enough for the turkey to be completely covered in oil. This could be as much as 5 -6 gallons of oil. To get a better understanding of exactly how much you need, cover the turkey in the pot with water to a level 1 to 2 inches above the turkey. Remove the turkey and measure the distance from the top of the pot to the surface of the water. Pour out the water and dry the pot thoroughly.
Pour in oil and heat to 350° F. This could take 45 minutes to an hour, depending on how much oil is used. Use the basket to carefully lower the bird into the hot oil. As it cooks, carefully move the bird in the basket so that it does not scorch. Cook the turkey 3 minutes per pound.
When it is done, the turkey will float to the top with a crispy brown skin. Use the thermometer to check for doneness (internal temperature of 180°F). Remove and allow the turkey to cool before serving.
Allow the oil to cool before disposing or storing it. To store oil, strain through cheesecloth or a coffee filter and refrigerate. Do not store oil that has been heated to the smoking point, has turned dark or has an off-odor. Reuse the oil within a month and discard if it foams when reheated.